This blog is helpful for those who are new in Oracle ADF 12c as well as for the professionals. This blog contains the basic and advanced concept of Oracle ADF 12c.

Tuesday, 14 March 2017

How to create a Static List View Object?


  • Now start creating view object. 
         Right click on the model project and select the view object from gallery.

  • Now give the name of view object, Lets say "StaticListViewObject" and select the Data source as Static List. and click next.

  • Now create attributes for this view object.

          Lets Say "EmpId, EmpName and Age". These attributes are transient attributes i.e the attribute which is created at view object level.

         For this click on new and create attributes, then click next.


  • Now for each attribute specify the constraints.and make each attribute as updatable to Always. and click next.


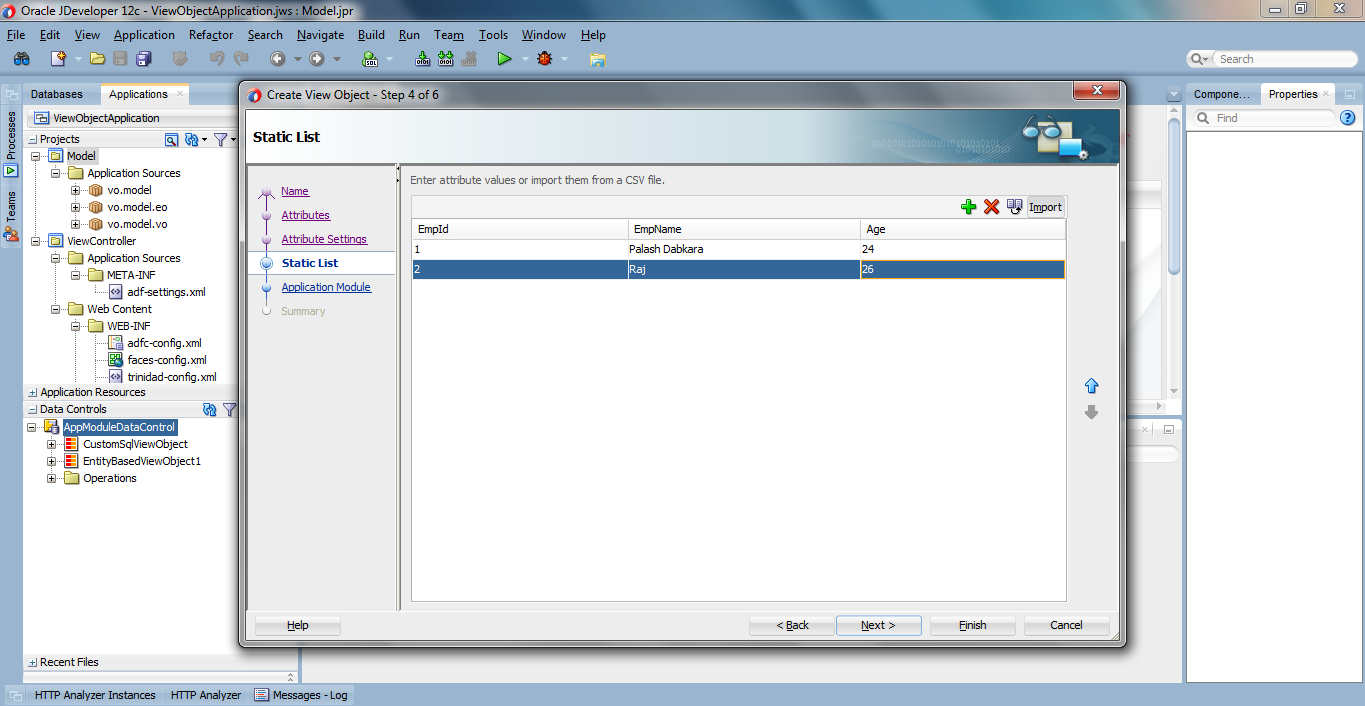
  • Insert the rows for this attributes or import csv file if available.and click next


  • If want to work with this view object on view layer then create view object instance on Application module impl xml file, and click next.


  • Following structure of view object, and click finish.


  • Static list View Object is created.

         You will see that view object is available at data control, that can be used to work on view layer.


  • Lets test the view object.

          Right click on AppModule file and run the model project.


Read More

Sunday, 12 March 2017

Different Ways to create a Managed Bean of jspx/jsf?

Create a Managed Bean for Page :-


  • Now we will create jspx page.

    Create a jsf/jspx page, for this refer to the post "How to create JSF/JSPX page by using Jdeveloper 12c?", change the page name to "TestPage2".


  • Create a managed bean for TestPage2.jspx.

Approach 1:-

  1. Open faces-config.xml file , go to the overview tab and select managed bean.

    2. Now create a managed bean by clicking on add icon.


     3.  Following popup appears and fill the following fields :-
           
          Bean Name   :-  Name of bean, Lets say "MyBean".
          Class Name   :-  MyClass
          Package         :-  Specify the package to keep this class.
          Scope             :-  Specify the memory scopes, we will select request scope.
          Registration  :- There are 2 options , One is configuration file, this will create a simple java file and other is Annotation, it will create a java class with annotation.
    
      Here we will create configuration file.

      Select the checkbox if we do not have any java class. and click ok.


      4.  You will see the entry of managed bean in faces-config.xml file.


       5.  Now this bean can be accessable on page.


            I have a button on jspx page and now we will bind button component to that bean.


Approach 2 :- 

1.  For this select the design view of TestPage2.jspx and double click on the component.
    Popup will appear.


2.  Mention the following details.

     Managed Bean :- click on new, following popup appears.
     

3.  Specify the following details:-

     Bean Name:- MyBean
     Class Name :- ShowResult
     Specify the Package.
     Scope :- Request.(you can select any scope according to the usage).

    Select the checkbox to generate a java file, and click ok.


4. Now specify the method name in ShowResult class. Let say "resultFromOtherPage", and click ok.


5. Following class is created.

Read More

How to create a custom sql based view object?


  • Now start creating view object.

          Right click on the model project and select the view object from gallery.

  • Now give the name of view object, Lets say "CustomSqlViewObject" and select the Data source as Custom SQL Query. Click next.

  • Now here write the select sql query or use query builder option to write query to fetch the data from db. and click next.


  • Now specify the bind variable for where clause in above query.

         Here we are not using any bind variable and click next.


  • Following db employee table column is mapped to view object attribute. Click next.


  • Here we will create new attribute or delete any attribute from view object, and click next.


  • Now for each attribute specify the constraints.

        Query Column section shows the db employee table column name which is mapped to this view object attribute.
click next.


  • Now following option shown to create java class:-

         View Object Class  :-  this class is used to work programmatically with view object, this class overrides the method of ViewObjectImpl class, that works to perform result on view object.

        View Row Class  :-  This class is used when work with only one row, it implements the ViewRowImpl class.

        Service Data Objects :- If want to use view object as a service, then create this class.
Here we are not doing any customization so unselect all checkbox.

       and click next.


  • If want to work with this view object on view layer then create view object instance on Application module impl xml file.

          click next.


  • Following structure of view object, and click finish.


  • Custom SQL Based View Object is created.

Read More

How to create an Entity Based View Object?


  • Now start creating view object.

Right click on the model project and select the view object from gallery.


  • Now give the name of view object, Lets say "EntityBasedViewObject" and select the Data source as Entity.

click next.


  • Now you will find the list of entity objects on left side , here we have one entity object "EmployeeEO" , So select it and shuffle to right side. By default Updatable checkbox is selected.


  • If you want to do DML opeartion on entity object based on this view object then select the checkbox updatable.

Here unchecked this option. and click next.


  • Now the attributes available on entity object is shown on left side, so shuffle the attributes which you want to use on view object.

Here we will select EmployeeId, FirstName and LastName. and click next.


  • Now for each attribute specify the constraints.

Query Column section shows the db employee table column name which is mapped to this view object attribute.
click next.


  • Following screen appears.

Here by default checkbox is selected "Calculated Optimize Criteria at Runtime", this option will automatically perform the select operation on this view object.
we can also specify the where clause but for this, view criteria is mandatory, creation of view criteria will be discussed on other post.
Here we are not creating where clause.
If you want sort the result on the basis of any fields then choose attributes on the order by section from which we have to sort.
click next.


  • Following screen appears.

Here create a bind variable to perform a where clause on query by using this variable, no need of creating a view criteria.
here we are not creating any bind variable.
click next.


  • Now following option shown to create java class:-

     View Object Class  :-  this class is used to work programmatically with view object, this class overrides the method of ViewObjectImpl class, that works to perform result on view object.
    View Row Class  :-  This class is used when work with only one row, it implements the ViewRowImpl class.
   Service Data Objects :- If want to use view object as a service, then create this class.
Here we are not doing any customization so unselect all checkbox and click next.


  • If want to work with this view object on view layer then create view object instance on Application module impl xml file.

click next.


  • Following structure of view object, and click finish.


  • Entity Based view Object is created.


Read More

How to create an Entity Object in Jdeveloper 12c?


  •  Following screen appears with a project structure on left hand side of the screen.

  • Project is created, now start creating the Entity Object.
          Right click on the model project from the project explorer window and select new ->  Entity Object.


  • Select the database connection and provide the credentials to access the database.and click ok.


  • Following screen appears. Oracle has default HR database, lets work on this database.
         Specify the name of entity object.


  • Click on Browse button to select the schema object/table. 
         Let select Employee schema and click ok.


  • Click Next.


  • Following screen appears. Here you will find all the table attributes/columns.which will be the entity attributes.
Here we can also add new transient attributes at entity level by clicking on New button. Click next.


  • Here for every entity attribute specify the constraints like mandatory, unique, primary key used for entity level validations. By default it picks the constraints defined on database tables, but we can change at entity level based on the requirement.and click next.

  • Following screen appears with an option:-
        Generate Entity Object Impl  checkbox  :- If we want to customize DML operation such as perform some logic at entity level then select this checkbox. It will create EntityImpl.java class.
        Entity Collection Class :- It will create EntityCollImpl.java

        Entity Definition Class :- It will create EntityDefImpl.java

But we are not performing any custom logic at entity side.So leave it as default and
click next.


  • Now in the next screen it will ask to create view Object on basis of this entity object.
As we are focusing on entity object on this post. So leave unchecked the checkbox and click next.


  • Next Screen shows the Entity Object Structure.click finish.

  • Entity object is created.

Read More

Social Profiles

Google Plus Email

Popular Posts

palash dabkara . Powered by Blogger.

Followers

Copyright © Oracle ADF 12c (Application Development Framework) Tutorial for Beginners | Powered by Blogger
Design by Palash Dabkara